In today’s era, where data theft is very common, protecting the information sent over the browser can be a bit risky. Thankfully in the past years, browsers have managed to implement various privacy features to eliminate data theft to a minimum.
Be it third party tracking, blocking the malicious ads, spyware, and malicious cookies. You can pretty much control all these privacy features. Among those features is the DNS-over-HTTPS (DoH). Google chrome has recently implemented this feature.
The purpose of this article is to demonstrate to you how to enable DNS-over-HTTPS (DoH) in Google Chrome, including all the required information that you must know about DoH.

In recent years, internet security and privacy have become significant concerns for users worldwide. One solution emerging as a champion in the realm of online privacy is DNS over HTTPS, abbreviated as DoH. This article will provide a comprehensive overview of DoH, its features, and its relevance in the modern digital world.
Read Also:
Contents
What is DNS-over-HTTPS (DoH) & How Is It Different From Normal DNS?
DNS-over-HTTPS (DoH) is a privacy and security protocol that was introduced recently. For those who are not well aware of a DNS protocol.
When you type any website name and hit Enter. The DNS protocol sends a request to the DNS server which in return tells the numeric IP address of the web server, which hosts the website that you have entered in the browser.
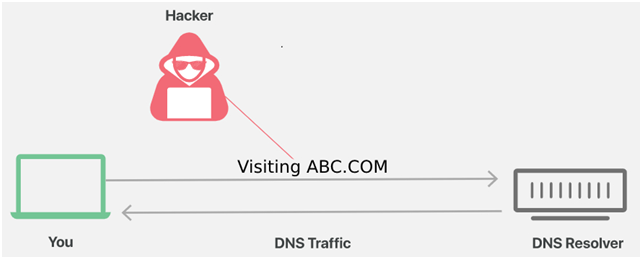
Now, DNS-over-HTTPS (DoH) do exactly the same thing, just with everything secured, or we can say encrypted. Normal DNS requests can easily be seen or tracked by third-party websites, observers, or hackers because the request is in plain text.

However, when the DoH is enabled, all the queries and packets are secured as HTTPS. So it becomes impossible to see the requests, resulting in safe, secure, and protected browsing.
What Does DNS over HTTPS Do?
DNS over HTTPS (DoH) is a protocol used for secure domain name system (DNS) resolution. Traditional DNS queries and responses are unencrypted, leaving them vulnerable to eavesdropping and tampering.
DoH encrypts these queries, ensuring they remain private and free from modification, providing users with an added layer of online security.
Benefits of DNS-over-HTTPS (DoH)
Since the main purpose of the DNS-over-HTTPS (DoH) is to make your browsing more secure. It surely brings some benefits which you can go through below.
- You will be protected against the various third-party trackers and observers who pretty much can see all the DNS requests that you make.
- All the requests, as well as responses that you will send or get, will be protected as the HTTPS packet.
- DoH helps in minimizing common login and authentication issue such as err_empty_response and similar other errors.
- Since everything is encrypted and no traffic, it will also help you in bypassing DNS based blocking.
- If you have an organization, it gives a sense of trust to all your clients and customers to be involved with your product much comfortably.
- Compatibility and Implementing DoH is easy, so you do not have to configure anything at a deeper level.
How to Enable DNS-over-HTTPS (DoH) in Google Chrome
Now that you know all about the DoH and its benefits, the final thing is to enable it. Although enabling the DNS-over-HTTPS (DoH) in Google Chrome is not too hard, but some of the users find it a little complex procedure.
For your ease, below are all the important steps that you require to enable this feature. There are basically two ways by which you can enable this feature on Google chrome. Both of them have been demonstrated below. Just make sure to follow each step carefully.
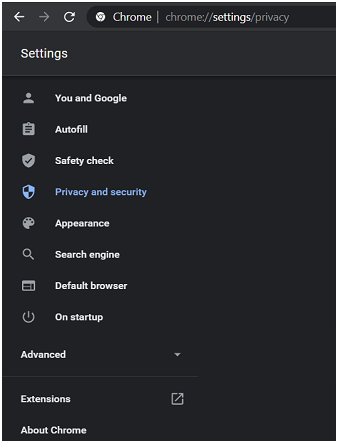
1. Using the Google Chrome Settings
In this method, we will manually enable the DoH by going into the Chrome settings. For easier understanding, follow the below steps.
Step 1: While the chrome browser in running, move your cursor to the 3-dot menu on the top right.
Step 2: Click on it, and from the menu, click on Settings.
Step 3: Now, on the left, click on Privacy and Security.
 Step 4: On the right, under the Privacy and Security section, click on Security.
Step 5: Now scroll down a little till you see Use secure DNS setting.
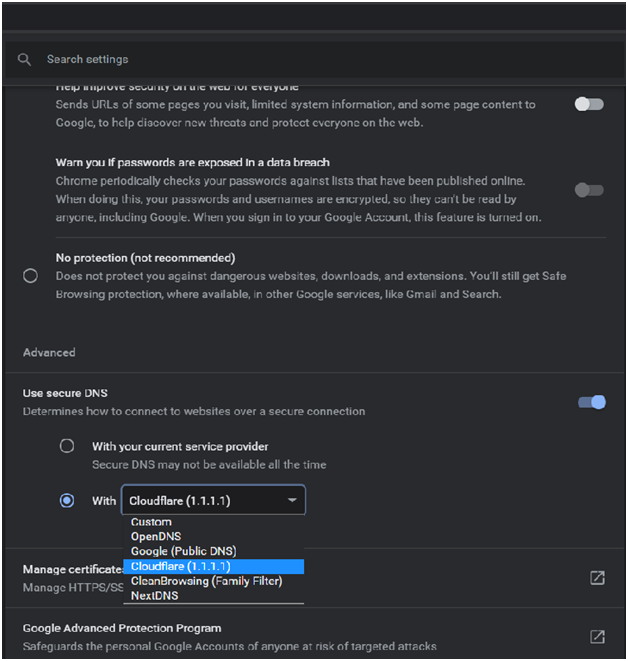
Step 6: Firstly, turn on the Toggle, then choose the 2nd option.
Step 7: From the drop-down menu, choose Cloudflare (1.1.1.1).
Step 8. Once selected, you are done. DoH is now active on your chrome browser.
2. Using the Chrome Properties
Although the first method is quite easy in itself, this method is easier. You simply have to paste a code that enables the DoH in the chrome properties. Now, whenever you launch the app, it will run with DoH active. Follow the steps.
Step 1: Make sure that the Chrome browser is not running.
Step 2: Now, on the desktop or the taskbar, wherever the shortcut file is, right-click on it.
Step 3: Go to the Properties once the Properties window is opened up.

Step 4: Click on the Shortcut tab.

Step 5: Now move your cursor to the Target field, and paste the below code at the end of the already present text.
–enable-features=”dns-over-https<DoHTrial” –force-fieldtrials=”DoHTrial/Group1″ –force-fieldtrial-params=”DoHTrial.Group1:server/https%3A%2F%2F1.1.1.1%2Fdns-query/method/POST
Step 6: Once the code is pasted, apply the changes.
Step 7: Now, you can run the chrome with DoH active.
Is DNS over HTTPS Like a VPN?
While both DoH and VPNs offer privacy features, they function differently. A VPN routes all your internet traffic through an encrypted tunnel, masking your IP address and safeguarding your data from potential interceptors. In contrast, DoH only encrypts DNS queries, leaving other aspects of your traffic unencrypted.
Who Uses DNS over HTTPS?
DoH is gaining traction among privacy-conscious internet users, cybersecurity enthusiasts, and corporations that prioritize data protection. Major browsers, including Firefox and Chrome, are now offering support for DoH, making its adoption more widespread.
Does DNS over HTTPS Hide IP?
No, DoH solely encrypts DNS queries. It doesn’t hide your IP address. For IP anonymity, one would need services like VPNs or Tor.
Why Disable DNS over HTTPS?
Some organizations might disable DoH due to concerns about bypassing network-based security solutions which use DNS queries for filtering or monitoring, potentially leading to a blind spot in security monitoring.
Does Google DNS Support DoH?
Yes, Google Public DNS supports DoH, allowing users to send DNS queries and get DNS responses over HTTPS.
Does Chrome Use DNS over HTTPS By Default?
While Chrome supports DoH, it doesn’t enable it by default for everyone. Instead, Chrome upgrades the user to DoH if their current service provider supports it.
Is DNS-Over-HTTPS Safe?
From a privacy standpoint, DoH enhances online security by encrypting DNS queries. However, it’s essential to use trustworthy DoH providers to ensure data integrity and privacy.
Is DNS-Over-HTTPS Free?
Yes, many providers offer DoH services for free, much like traditional DNS services.
Should I Use DNS over HTTPS?
If privacy and security are concerns, implementing DoH is a positive step. It shields DNS queries from potential eavesdroppers. However, users should understand its limitations and combine it with other security measures, like VPNs, for complete privacy.
Read Also:
Wrapping Up
DNS over HTTPS is an evolving protocol, playing a crucial role in the shift towards a more private and secure internet. While it’s not a one-size-fits-all solution, its growing adoption signifies a step in the right direction for online privacy.
Always stay informed and combine multiple security solutions to ensure comprehensive online protection. DNS-over-HTTPS (DoH) is definitely a good move in the direction of secured browsing. It prevents the user from being tracked by the website or observers.
The article talks briefly about what DoH is. And how it is beneficial to a user or an organization. Furthermore, the guide deeply tells the two ways to enable the feature on your chrome browser. Hopefully, all your queries have been answered. Thank You!
