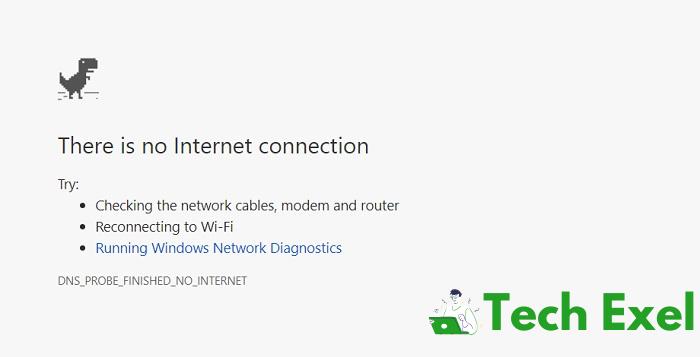
Many times during internet browsing internet browsers encounter the DNS_PROBE_FINISHED_NO_INTERNET error in chrome. The error occurs due to many sources. Sometimes the error occurs due to the failure of Domain Name Server (DNS) to load cache files. Follow the simple steps given below.
One of the most commonly encountered error messages on Google Chrome and other web browsers is “DNS_PROBE_FINISHED_NO_INTERNET.” This error typically signifies an issue with your internet connection or the DNS (Domain Name System).
In this comprehensive guide, we’ll delve into what this error means, its primary causes, and steps to resolve it across different Windows versions. We’ll also touch upon the safety of DNS firewalls.
Read Also:
Contents
What Does DNS_PROBE_FINISHED_NO_INTERNET Mean?
This error implies that your browser couldn’t access the website you’re trying to visit because it couldn’t resolve the domain name into an IP address, primarily due to internet connection issues or DNS misconfigurations.
Causes of the DNS_PROBE_FINISHED_NO_INTERNET Error:
- Faulty Internet Connection: The most straightforward cause is that your internet connection might be down.
- Misconfigured DNS Settings: Incorrect DNS server addresses can prevent websites from loading.
- Outdated Network Drivers: Outdated or incompatible network drivers can disrupt the internet connection.
- Firewall or Antivirus Interference: Sometimes, firewall settings or antivirus programs can block certain web activities.
How to Fix DNS_PROBE_FINISHED_NO_INTERNET in Chrome
Solution 1 ⇒ Restart Your Computer System
First, open the Start menu. Then click on the Power icon and select the Restart option.
Solution 2 ⇒ Change DNS IP Address
Step 1 ⇒ First click the Start icon and open the Control Panel.
Step 2 ⇒ Then select Network and Internet tab from the Control Panel window.
Step 3 ⇒ Now select Change Adapter Settings present on the left pane of Network and Sharing Center window.
Step 4 ⇒ Do a right-click on the network interface connected with the internet and select the Properties option.
Step 5 ⇒ Then click on IPv4 and select properties.
Step 6 ⇒ Type your Preferred DNS server address and Alternate DNS server.
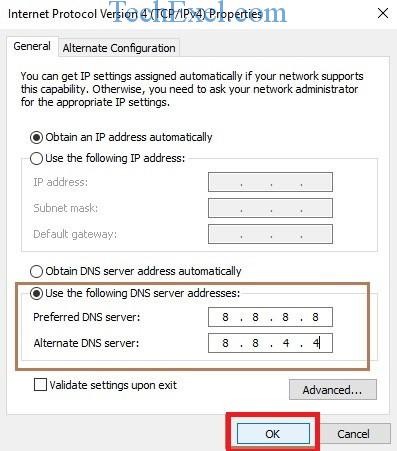
Step 7 ⇒ Finally click the OK icon.
Solution 3 ⇒ Clearing the DNS Cache
Step 1 ⇒ First open the Start menu.
Step 2 ⇒ Then type Run in the search box and press Enter key.
Step 3 ⇒ Then in the Run window type cmd and press Enter key.
Step 4 ⇒ In the command prompt window, type ipconfig /flushdns.
Step 5 ⇒ Finally press the Enter key and reboot your operating system.
Solution 4 ⇒ Reset Google Chrome
Step 1 ⇒ First open the Start menu.
Step 2 ⇒ Then type Run in the search box and press Enter key.
Step 3 ⇒ Then in the Run window type: %LOCALAPPDATA%\Google\Chrome\User Data\ and press Enter key.
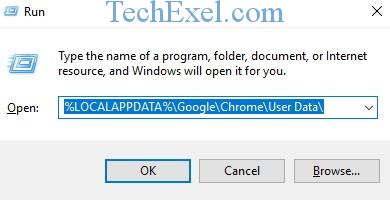
Step 4 ⇒ Now in the Windows Explorer locate the default folder and rename it to Default.old.
Step 5 ⇒ Finally Reboot your Operating System.
How Do I Make My DNS Available?
- Restart Your Router: This can help reset any temporary issues with your network.
- Change DNS Servers: Switch to public DNS servers like Google’s (8.8.8.8 and 8.8.4.4) or OpenDNS.
- Flush DNS Cache: Enter
ipconfig /flushdnsin the command prompt to clear the DNS cache. - Restart the DNS Client: Navigate to ‘Services’ in Windows, find ‘DNS Client’, and restart it.
How Do I Fix Internet Disconnected Error?
- Troubleshoot Your Internet Connection: Use Windows’ built-in troubleshooter to diagnose and fix common network issues.
- Restart Your Computer: This can clear temporary software glitches.
- Update Network Drivers: Visit your PC manufacturer’s website and download the latest network drivers.
- Disable VPN: If you’re using a VPN, it might be causing the issue. Disabling it can help.
Steps to Resolve DNS_PROBE_FINISHED_NO_INTERNET in Windows:
For Windows 7, 8, and 9:
- Change DNS Servers:
- Open
Control Panel. - Navigate to
Network and Sharing Center. - Click on
Change adapter settings. - Right-click on your active network connection and choose
Properties. - Double-click on
Internet Protocol Version 4 (TCP/IPv4). - Choose “Use the following DNS server addresses” and set preferred DNS server to
8.8.8.8and alternate DNS server to8.8.4.4(Google’s public DNS). - Click
OKand restart your browser.
- Open
- Flush DNS Cache:
- Open the Command Prompt as an administrator.
- Type
ipconfig /flushdnsand hit Enter.
For Windows 10, 11, and 12:
- Change DNS Servers:
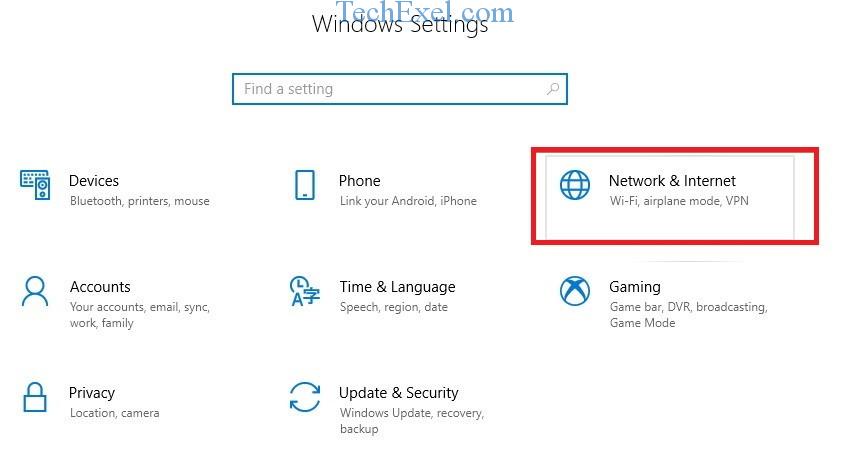
- Go to
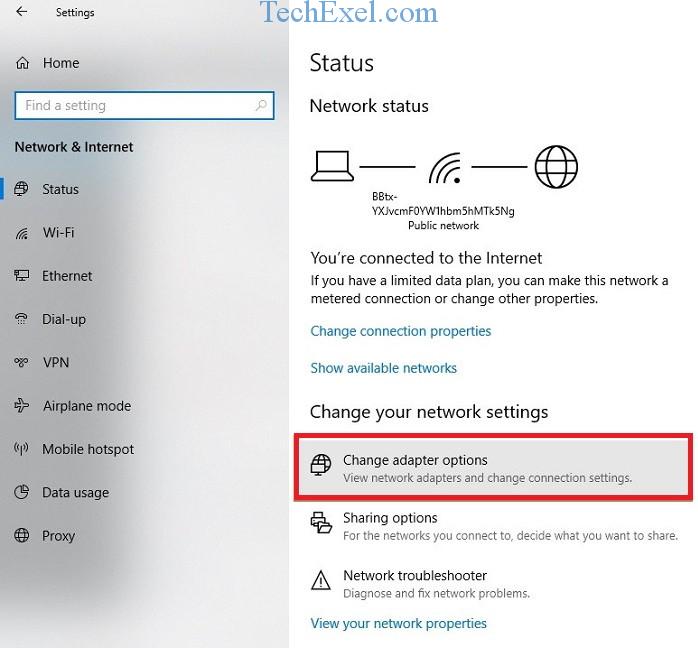
Settingsand selectNetwork & Internet. - Under the
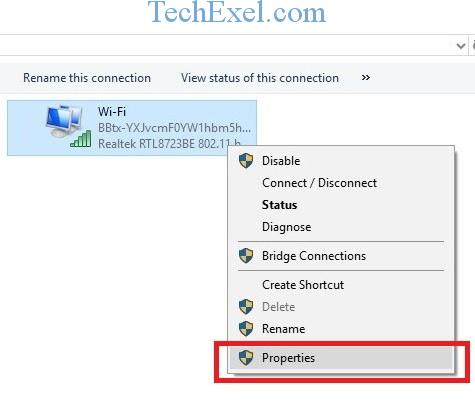
Statustab, click onChange adapter options. - Right-click on your active connection and select
Properties. - Double-click on
Internet Protocol Version 4 (TCP/IPv4)and set the DNS as mentioned above.
- Go to
- Reset Network Settings:
- Open Windows Settings and go to
Network & Internet. - Click on
Network resetat the bottom. - Click
Reset now.
- Open Windows Settings and go to
- Flush DNS Cache:
- Same as above; open Command Prompt as administrator and use the
ipconfig /flushdnscommand.
- Same as above; open Command Prompt as administrator and use the
Some Additional Tips:
- Restart Your Router: Sometimes, the problem might be with your router. Restarting it can help reset any temporary glitches.
- Check for Larger Outages: If multiple devices in your home can’t connect, there might be a larger service outage. Check with your ISP.
- Update Network Drivers: Outdated drivers can cause connectivity issues. Ensure your network drivers are up to date.
Is DNS Firewall Safe?
A DNS Firewall works by filtering DNS traffic to prevent access to malicious domains. It’s a layer of security that can effectively block malware, phishing sites, and other threats. Using a DNS firewall is generally safe and can add an extra layer of protection to your internet browsing.
Read Also:
Conclusion
The above solutions will fix the “DNS_PROBE_FINISHED_NO_INTERNET” error in chrome easily. The above solutions are simple, and with proper execution, the error can be solved easily within a few minutes.
The “DNS_PROBE_FINISHED_NO_INTERNET” error, while common, can usually be resolved with some basic troubleshooting. By understanding its causes and solutions, you can get back to a seamless browsing experience. Moreover, implementing tools like DNS firewalls can ensure a safer online experience without compromising website accessibility.
The DNS_PROBE_FINISHED_NO_INTERNET error can be a temporary hiccup or indicate a more serious issue with your network settings. Thankfully, with the methods outlined above tailored for each Windows version, you can quickly troubleshoot and fix the problem, ensuring a smooth and uninterrupted browsing experience.
Always remember, the key to resolving any technical problem is understanding it first, then applying the relevant solutions step by step. Thanks for read the our fully DNS_PROBE_FINISHED_NO_INTERNET Article. Enjoy the Your Day! Happy reading!
