In Minecraft, you may build literally hundreds of different types of machines. The slime block flying machine is one of the more outlandish options. Observers, slime, and pistons all contribute to the operation of this machine.
Minecraft, the sandbox world of endless creativity, constantly evolves with new features and inventions. One such innovation is the Flying Machine, a fascinating contraption that allows players to soar through the skies and explore their blocky world from a whole new perspective.
In this comprehensive guide, we will delve into what a Flying Machine is in Minecraft, the materials needed to create one, how to make a Flying Machine, when and where to use Flying Machines, their worth, the benefits they offer, their safety, and how to obtain them for free.
Contents
What Is a Flying Machine in Minecraft?
A Flying Machine in Minecraft is a redstone-powered contraption that enables players to move blocks, entities, or themselves through the air. It utilizes the game’s redstone mechanics to create a moving platform capable of flight. Flying Machines are a testament to Minecraft’s limitless possibilities for invention and exploration.
Read Also:
What You Need to Create a Flying Machine in Minecraft
To create a basic Flying Machine in Minecraft, you will need the following materials:
- Blocks: Gather building blocks of your choice to construct the body of the Flying Machine. Common choices include solid blocks like stone, wood, or obsidian.
- Slime Blocks: Slime blocks are essential for the movement of the Flying Machine. You will need a minimum of two slime blocks, but the number may vary depending on your design.
- Honey Blocks (Optional): Honey blocks can also be used in Flying Machines, as they exhibit unique properties, such as preventing adjacent blocks from sticking together.
- Redstone Components: You may need redstone components like observers, pistons, and redstone dust to power and control the Flying Machine.
How to Make a Flying Machine in Minecraft
Creating a Flying Machine in Minecraft can be a complex process due to the variety of designs and functions available. Here is a simplified guide to constructing a basic horizontal Flying Machine:
- Gather Materials: Collect the necessary blocks, slime blocks, honey blocks (if desired), and redstone components.
- Design the Machine: Plan the design and layout of your Flying Machine, considering the direction of movement, the number of slime blocks, and the placement of observers and pistons.
- Build the Machine: Construct the body of the Flying Machine using your chosen blocks. Place slime blocks in a manner that creates a platform, and attach observers and pistons to enable movement.
- Redstone Setup: Create a redstone circuit that powers the Flying Machine. Connect observers to pistons and power them using redstone dust or other redstone components.
- Test the Machine: Before boarding your Flying Machine, thoroughly test it to ensure it operates as intended.
- Enjoy Flight: Once your Flying Machine is functional, hop on and enjoy the exhilarating experience of flight in Minecraft.
How To Make A Flying Machine in Minecraft
The flying machine may be sluggish, but it’s perfect for scoping out vast stretches of ocean or lava. How to construct a basic flying machine, along with suggested applications, are covered in this manual.
You need to pack up your stuff and get ready to take off. You can use your flying machine with the newest version of Caves and Cliffs (1.17).
How to Get the Blocks You Need to Make a Flying Machine in Minecraft
What you’ll need to construct your flying machine are:
- Numbering one piston
- Wet, gummy piston: 1
- Two onlookers
- 5 constituent parts
- Seven glop cubes
- barriers and scaffolding that are only there temporarily
If you want to construct this flying contraption, you’ll need some sort of scaffolding or makeshift blocks to get to the top. Simple placement on the ground and selection of preexisting scaffolding constitutes using scaffolding.
In doing so, an upwardly-expanding tower will be produced. All you have to do to destroy the scaffolding is break the base block. Almost all of the components for this design may be found in common places, though slime bricks could prove challenging to track down.
There are nine individual slimeballs that come together to form a slime block. To obtain them, one must kill slimes that appear in slime chunks at a depth of at least 40. Finding slime chunks might be a challenge, but this handy tool makes the search a breeze.
The map will show you every slime chunk in the world once you type in the name of your seed. On occasion, the itinerant merchant will offer four emeralds for one slimeball. You’ll need 63 slimeballs, so this isn’t the finest value.
Minecraft: Instructions For Constructing Sn Aircraft
You need to find a suitable location for the flying machine first. Pick a spot that stands out from the rest of the terrain as much as possible. Having located a suitable location, a “pillar” of support must be erected.
Scaffolding can be used instead; just be sure to build up high enough that your flying vehicle won’t collide with the ground below. Place a single slime brick atop each pillar in your base. You can knock down the pillar if you have everything you need to do so.
The column will be eliminated from this manual, but you are free to keep it for as long as you like. After the process is finished, you must take it out of the machine. You may control the flight of your flying machine by placing a second slime block in the desired path.
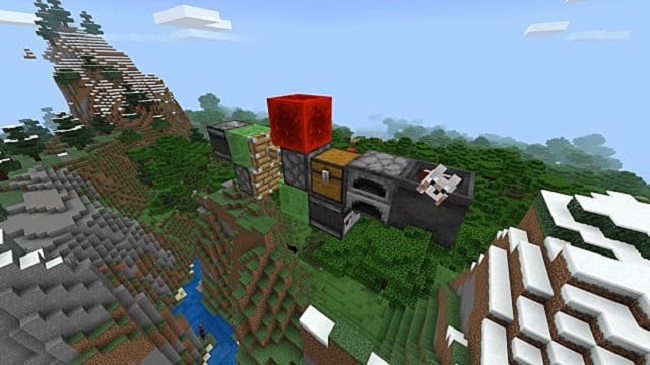
Then, as depicted above, plop an observer down next to the initial slime cube. For this reason, you should position the observer so that their back is to the path you will take. One piston should be positioned so that its axis is perpendicular to the observer’s red pinpoint.
Two more slime blocks in a row should be placed to the right of the piston, and a third block should be placed to the left. See the picture up above for proper positioning. The piston should be positioned such that the exhaust is inverted ‘L’ shape.
Insert a second sticky piston into the cavity, with its sticky side towards the first piston. To counteract the two slime bricks you started with, the sticky piston will push in the opposite direction.
It’s important to have two slime bricks in the nose of the aeroplane, facing the direction you’ll be flying. On top of those, add two more slime blocks. Ideally, it would look like a 2×2 square from the front.
You’ve got this! Put the second observer in a position where the arrow on the side is pointing downward. The arrow should point downward, but the side on which it is placed is irrelevant. For the best view, the spectator should keep their head and neck straight and look above.
It can be difficult to turn the observer in this direction, so you can use temporary blocks if you need to. In the end, you’ll want to line up your five blocks with the sticky piston in the front of the flying machine. It needs to be in the lower left corner of a 2×2 square when viewed from the front. You’ll be standing in this space.
The machine will propel you forward, and you will bounce in the same direction. Make sure you’re standing on this 5×1 platform to save you from being thrown off the machine. You can now test your finished flying machine! Yet, you might observe that it is not moving.
Place a block on top of the observer with the up arrow pointing, and then rapidly break it to activate the flying machine. The device needs to start going ahead now. It’s a little more challenging to halt the machine. Destroying the upper-most observer will stop the machine.
To restart the system, you’ll need to replace the observer, which shouldn’t be too tricky. Another block can be placed on a machine’s front in order to obscure its face from an observer standing in the machine’s rear.
Although this may prove difficult, no structural damage is necessary. In the grand scheme of things, it’s easier to just get rid of the person looking up.
Use of Aircraft Equipment
Where do you take your newfound expertise in constructing flying machines from slime blocks? As was already noted, it is not ideal for regular use around your outpost. This aircraft performs admirably over expansive stretches of both lava and water.
There is a certain degree of danger involved with exploring the Nether. Looming foes and lava seas extend as far as the eye can see. Constructing this airship might help you in your quest to discover the depths of the Nether.
It’s capable of carrying you safely through vast stretches of lava as you soar on it.
When and Where to Use Flying Machines in Minecraft
Flying Machines in Minecraft have a wide range of applications:
- Transportation: Use Flying Machines for rapid and efficient transportation across vast landscapes.
- Mining: Construct specialized Flying Machines for automated mining operations, allowing you to collect resources quickly.
- Automation: Create automated farms and contraptions using Flying Machines to move items, mobs, or other game elements.
- Exploration: Explore your world from the skies, uncovering hidden structures and terrain features.
Is a Flying Machine in Minecraft Worth It?
The worth of a Flying Machine in Minecraft depends on your gameplay style and objectives. If you enjoy exploring your world from new perspectives, automating tasks, and optimizing resource collection, then a Flying Machine is undoubtedly worth the effort of creation.
Benefits of Using a Flying Machine in Minecraft
Using a Flying Machine in Minecraft offers several benefits:
- Rapid Travel: Flying Machines provide an incredibly fast mode of transportation across your world.
- Automation: They can automate resource collection, farming, and other tasks, saving you time and effort.
- Exploration: Discover hidden secrets and breathtaking views by soaring through the skies.
- Creativity: Designing and building Flying Machines allows you to express your creativity within the game.
Is a Flying Machine in Minecraft Safe?
Flying Machines in Minecraft are safe to use within the game’s mechanics. They are a player-created contraption designed to enhance gameplay and exploration, and they do not pose any real-world risks or dangers.
How to Get a Flying Machine in Minecraft for Free
To obtain a Flying Machine in Minecraft for free, you need to craft and build one within the game world. The materials required for a basic Flying Machine can be obtained through mining, farming, and resource gathering.
Follow the steps outlined in this guide to construct your Flying Machine and embark on exciting adventures in the skies of Minecraft.
Read Also:
In conclusion
Flying Machines in Minecraft are a testament to the game’s endless creativity and innovation. Whether you use them for transportation, automation, or exploration, they offer a thrilling and versatile addition to your gameplay experience.
So, gather your building materials, embrace your inner inventor, and take to the skies with your very own Flying Machine in the blocky universe of Minecraft.
