If you’re a player of Minecraft, you’ve probably seen player-created personalised artwork and wondered how you may do the same.
Minecraft, the beloved sandbox game, is not only about mining and crafting but also about unleashing your creativity. One way to express your artistic side in the game is by creating paintings.
In this detailed guide, we will explore what paintings are in Minecraft, what you need to make them, how to uncover secret paintings, the benefits of using paintings, their safety in the game, and how to obtain them for free.
Contents
What Are Paintings in Minecraft?
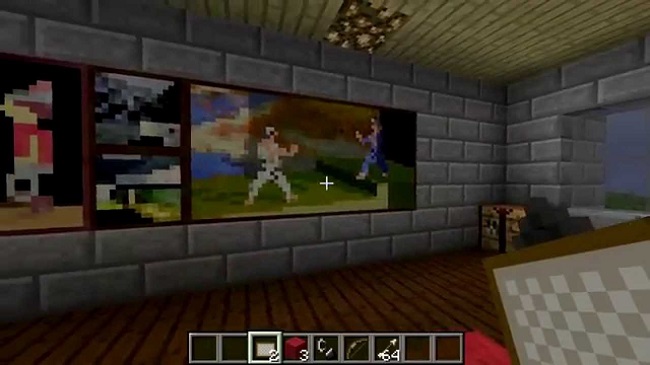
Paintings in Minecraft are decorative elements that allow players to display various artwork and designs on their walls. These paintings come in different sizes and patterns, adding a touch of aesthetic appeal to your in-game surroundings. Paintings are not only visually pleasing but also a great way to personalize your virtual world.
How To Make A Painting in Minecraft
The good news is that it’s not too difficult to accomplish. Adding a personalised painting to your Minecraft environment is as easy as following a few steps’ worth of instructions.
Read Also:
Let’s have a look at the simple process involved in incorporating your own paintings into the game. The next guide will teach you how to create your Minecraft house one of a kind.
Create Your Own Unique Minecraft Paintings!
To begin, let’s go over the necessary steps.
There are now 26 paintings in Minecraft that can be used as wall decor. They range in size from 16 by 16 pixels, covering just one block, to 64 by 64 pixels, encompassing four by four grid cells.
You will need to change one or all of the existing paints on your Minecraft server with your own images if you want to create a custom painting. Before starting the game, you’ll need to replace the artwork by navigating to the appropriate folder on your PC and doing it there.
After that, the next time you launch the game, the newly uploaded paintings will be available for selection and use. You’ll require both your preferred photo editing programme and an extraction programme like WinRAR.
You are free to upload any image or photograph you like, and you can even make your own in-game artwork and save screenshots of it to use as in-game artwork.
Discover the Appropriate File Binder
To get started, open a folder on your computer called “%appdata%.” Then, launch Minecraft from the appropriate app and navigate to the folder containing the game’s downloadable artwork.
To accomplish this, please refer to the following instructions:
- Type Win+R into the keyboard.
- To access your application data, type %appdata% and press Enter.
- You can now access your application data. Choose the Roaming file folder. (The directory may be located elsewhere; to access it, put “Roaming” into the Run window.)
- You need to access the minecraft.jar file, so open the folder it’s in. Select Open with from the context menu, and then navigate to WinRAR or another unzipping programme.
- Look for the picture folder and open it. You’ll only find one file there, and it’s called kz.png.
- The file should be copied to your desktop.
- Launch your chosen image editing application and paste the copied file in.
- If you open the file, you’ll see pink cubes standing in for the game’s actual cubes. To an existing image in the file, drag the desired image and drop it. Adjust the image’s dimensions till they match those of the lost painting.
- After editing the kz.png image, save the changes and overwrite the original in the art folder.
- To verify that the picture has been successfully replaced, please re-open the updated kz.png file.
- Start up Minecraft and transfer the modified image to the game’s world.
To use your own photos, pictures, or sketches in lieu of the original art, simply repeat the steps in this section for each image.
Easily Make Your Own In-Game Pics
You can take screenshots within the game and use them as artwork if you so choose. You can modify the game by making your own items, taking screenshots, and replacing the stock images in the main “kz.png” file with your own.
The steps are the same as previously, however you’ll be using the “screenshots” folder from within your game’s file rather than images from the internet or your own photos. The options are limitless, allowing you to showcase your ingenuity to everyone who cares to see it.
Creating a unique situation from which to capture a snapshot is time-consuming, but the result is well worth it.
Create Something One-of-a-Kind in Minecraft.
A couple of years after the game was out, paintings were added, and almost immediately, a market for player-commissioned paintings emerged. As expected, the option to personalise one’s experience eventually became accessible.
You are free to use any image you choose in your in-game creation. Due to recent enhancements, video uploading is now a viable option. Go ahead and give it a shot yourself to see if you can design some interesting worlds for other gamers to explore.
Do you have any experience with modifying Minecraft with your own pictures? Use the space below to share your story with us.
What You Need for Making a Painting in Minecraft
To create paintings in Minecraft, you will need the following materials:
- Wool: The primary ingredient required for crafting paintings is wool. Wool can be obtained by shearing sheep or crafting it from spider silk using four strings.
- Sticks: You’ll also need sticks, which can be crafted by placing two wooden planks vertically in a crafting table or your inventory crafting grid.
How to Craft a Painting in Minecraft
Follow these steps to craft a painting in Minecraft:
- Gather Materials: Collect the required materials – wool and sticks.
- Access the Crafting Table: Approach a crafting table or open your inventory crafting grid.
- Craft the Painting: Place one piece of wool in the center slot of the crafting grid and two sticks in the row beneath it. This arrangement will yield one painting.
- Collect Your Painting: Once crafted, the painting will appear as an item that you can drag into your inventory.
- Hang the Painting: Select the painting from your inventory and right-click (or equivalent action) on a wall in your Minecraft world to place it.
- Choose a Painting: After placing the item frame, right-click it again to cycle through various painting options until you find one you like.
How to Find Secret Paintings in Minecraft
Minecraft features secret paintings that can be uncovered by following these steps:
- Gather Resources: Collect wool and sticks as mentioned earlier.
- Craft a Painting: Craft a painting using the same process outlined above.
- Place the Painting: Hang the painting on your wall.
- Discover the Secret: Occasionally, when you place a painting, it may reveal a hidden image. These secret images are randomly generated and add an element of surprise to your artwork collection.
Benefits of Using Paintings in Minecraft
Paintings in Minecraft offer several benefits:
- Decoration: Paintings allow you to decorate your in-game home or structures, adding a personal touch to your surroundings.
- Artistic Expression: They enable you to express your creativity and artistic flair by choosing different paintings and arrangements.
- Conceal Hidden Rooms: Some players use large paintings to hide secret passages or rooms, adding an element of intrigue to their builds.
- Enhanced Aesthetics: Paintings can enhance the overall aesthetics of your Minecraft world, making it visually appealing and captivating.
Is Painting in Minecraft Safe?
Painting in Minecraft is entirely safe and poses no risk to your character or the game environment. It is a purely decorative feature that adds beauty and personalization to your world.
How to Get Paintings in Minecraft for Free
In Minecraft, paintings can be crafted using the materials mentioned earlier – wool and sticks – without any additional cost. Simply explore your world, gather the necessary resources, and create as many paintings as your heart desires.
There are no in-game purchases or real-world expenses associated with obtaining paintings.
Read Also:
- How To Make A Secret Door in Minecraft
- How To Make A Sword in Minecraft
- How To Make A Blast Furnace in Minecraft
In conclusion, paintings in Minecraft are a delightful way to express your creativity and decorate your virtual world. Crafting paintings is a straightforward process, and their versatility allows you to add a personal touch to your in-game surroundings.
Whether you’re creating a cozy home, an artistic gallery, or using paintings to conceal secret passages, they are a valuable addition to your Minecraft experience. So, grab your materials, let your artistic side shine, and start crafting beautiful paintings to adorn your pixelated masterpiece.
