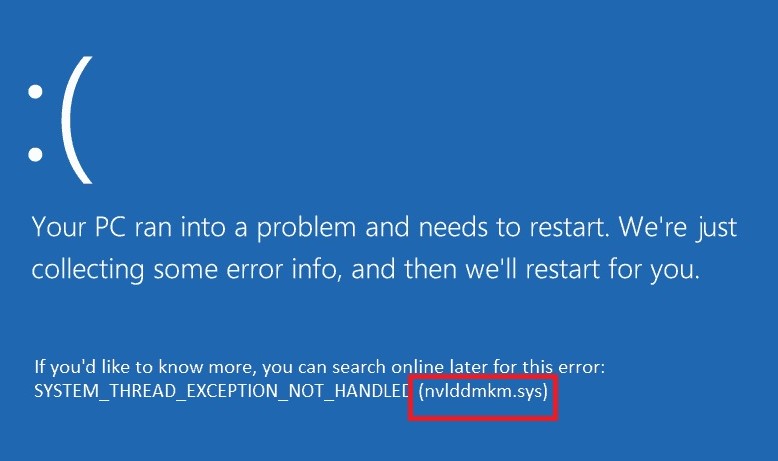
Nvlddmkm.sys is the most common problem on Windows 10. However, we have 7 methods to fix nvlddmkm.sys error on Windows 10. These methods will help you to resolve such an issue as well as save your time.
Windows 10 has grown as one of the best-operating systems powering nearly 1 million devices worldwide. The web developers know about the upcoming dictates and always launch a new version of the OS according to the user ultimatum. Incessantly it runs very smoothly; however it creates delusion occasionally.
When resetting of driver or GPU delay freakishly, the blue screen of deaths seems to the screen. This is a blue screen error additionally known as Video_TDR_Failure. In this abbreviation, T stands for Timeout, D stands for detection, and R stands for Recovery. However, there are errors, but solutions are also possible based on the cause of the error.
In this article, we will talk about the nvlddmkm.sys error on Windows 10. There are multiple ways to fix such a problem; however, we must know about the several possible causes of the error. So, you can stipulate the appropriate method to fix nvlddmkm.sys error.
Contents
How to Fix Nvlddmkm.sys Error on Windows 10?
There are several possible causes for nvlddmkm.sys error, but here are some protuberant ones:
- Incompatible graphics card drivers.
- Incorrect memory timing or voltages.
- Overheating.
- Working on multiple programs in the system.
- Graphics card encumber.
- RAM issuance.
Here are some possible methods to fix this issue. Unfortunately, If one of the solutions does not fix your problem, you can try other methods.
Method 1: Reinstall Graphics Card Driver
The faulty graphics card driver is one of the major causes of nvlddmkm.sys error. The reason behind this can be the debauched file caused TDR failure. Thus one should reinstall the driver to replace the corrupted files and proper work of the system.
- Firstly, Turn On your computer and press the Power button and hold it until it turns off itself. Repeat this process about two to three times until Preparing Automatic Repair appears on the screen.
- It can take some time to show options to the screen. After this, you will find the Startup Page. Then, Click on the Advanced Options.
- Afterward, the Choose an Options page will appear; select Troubleshoot from there.
- In the Troubleshoot menu select Advanced options.
- Furthermore, on the Advanced Options page, select Startup Settings.
- On the right side of the bottom of the screen, you will find the Restart option. and Click on it.
- If you want to enter in safe mode without a network, press the F4 key, and to enter in safe mode with a network, press F5 key.
- After these steps, your system is booted in safe mode. You can press Enter to return your operating system.
- Type Device Manager on Menu or Press Windows key+X together and select it.
- Find a Display adapter and expand it.
- Click on the NVIDIA GeForceTX750 and click on the Uninstall Device.
- Click to Delete the driver software for this device and then select the OK option on the prompt window.
- After this, download the latest version of the driver and install it.
- Go to the driver’s directory. This is generally located at C:\Windows\System32\Drivers. Find the file sys and click right and rename it to nvlddmkm.sys.old.
- Click OK for the confirmation when prompted.
- Afterward, navigate the C:\ drive of your computer and find the NVIDIA folder, and copy & paste sy_ there.
- Type the command exe nvlddmkm.sy_nvlddmkm.sys in the command window.
- Copy this newly created file in C:\drive and paste this file to the C:\Windows\System32\Drivers folder.
- In the last, go to the main menu and click on the Restart option and restart your PC safely.
After all these steps, you will not find nvlddmkm.sys windows 10 error again. However, you are getting such an error you can follow other methods.
Method 2: Run a disk check on your system
Many times the nvlddmkm.sys error can be caused by the faulty disk issuance. So, it is necessary to run a disk check to avoid such trouble. This can involve some data loss. thus, you should back up your data before proceeding. The disk is periodically checked for some system errors during automatic maintenance. Below are the steps you can follow to run a disk check on your system:
- Firstly, press Windows key+X together a conjure list will appear on the screen.
- Click on the Command Prompt (Admin) on the list and run as Administrator.
- Open the command window and type chkdsk /f c: then hit the Enter Then, press Y and hit Enter button again.
- Now, close the command window and click on the Restart on the main menu. It will take approximately 20 minutes to restart after the disc checking process.
- If there some errors left, correct them.
Once you rectify the errors, your system will not show the nvlddmkm.sys error. However, this method will not fix them; then you can go for further methods.
Method 3: Check for updates for the drivers on your graphics card
Outdated Graphics card can create troubles many times. You have to check whether your graphic card is updated or not. It is very tranquil to update drivers. Some third-party drivers make tranquil for users to make their drivers updated. If you want to manually update your graphics card you can simply follow these steps:
- Firstly, find out which model of Graphic card you are using. It is updated or not. If you already know this information, you can further proceed, but if you don’t know, you need to check first.
- Open the DirectX Diagnostic tool or just press Windows key and R together to open the Run dialog box. Once the dialog box is open, type the dxdiag and press Enter. Click on the Display tab in the diagnostic tool to find information about your GPU. You also need to know whether you have a 32 -bit or 64-bit OS. You can find this information by the System tab.
- Check the official website and download the latest version of your graphics card and install it.
- Once you select, you should have to download and install it.
- Restart your PC.
Method 4: Run a memory check on the system
On Windows 10, If applications are running very slowly, there can be RAM causing troubles. So, the first thing you have to check it’s memory. To fix this issue, run a memory check on the system. You can simply use these steps to diagnose memory issue on windows 10:
- At first, press Windows key + R together, that will conjure a Run command.
- Type mdsched.exe in the run command box and select OK.
- Now, click twice on the Windows Memory Diagnostic, and you will find two options.
- You can either select Restart now and check for problems (recommended) or Check for problems the next time I start my computer.
- It will take approximately 15 to 20 minutes to check Memory.
- Now Restart your computer and if errors are displayed, rectify them accordingly.
After rectifying the errors and running the memory check successfully, nvlddmkm.sys error will not appear again, but if this method is not working properly then, you can follow the further methods to fix this issue.
Method 5: Removing Any Conflicting Programs
The probable cause of nvlddmkm.sys error can be any current installation. You can simply fix this issue by uninstalling the program. You can use these methods:
- At first, go to the Settings on your computer.
- Click on the App. Then, select on the Apps & the features.
- Select the program you want to remove. Click this and uninstall the program.
In case if you are still getting nvlddmkm.sys error on your computer, the reason can be an overloaded graphics card. You can use the further next method to prevent this error.
Method 6: Change the Graphic Card
It can be the possible cause for nvlddmkm.sys error that your graphics card is overloaded due to the gaming or other running applications. The only method to solve this issue is to alter the graphics card accordingly. Once you change the graphics card, your problem will resolve absolutely.
Method 7: Update Your Windows
The system use windows 10 will automatically update when a new version is released. But you have to check manually for the latest window update. It is essential for the NVIDIA GPU driver and also fixes some bugs and malware. You can get rid out of nvlddmkm.sys error for once and while.
- Open the Start menu by pressing the Windows key or clicking the Windows icon.
- Inside the Windows Setting menu, click the Update & Security.
- Then, click on the Windows update.
- After this, select Advanced options. Click on the option and Update Windows.
Conclusion
We hope that one of these methods will help you to fix the annoying nvlddmkm.sys error on Windows 7 or later version. It is preferable to remain your system updated so that errors will not occur.
