The .Net runtime optimization service optimizes your system or your computer and helps it start and process apps or programs fastly. .Net runtime optimization service is responsible for launching applications as quickly as possible. This optimization service runs in the background, and Microsoft has stated that it shouldn’t run for more than a few minutes.
But sometimes, the optimization process takes a lot of time and utilizes much of your CPU resources. Users have experienced the .net runtime optimization service often consumes a large amount of CPU processing power; thereby, instead of making your apps or programs run faster, your whole system responds slowly using 80-90% of your CPU machines.
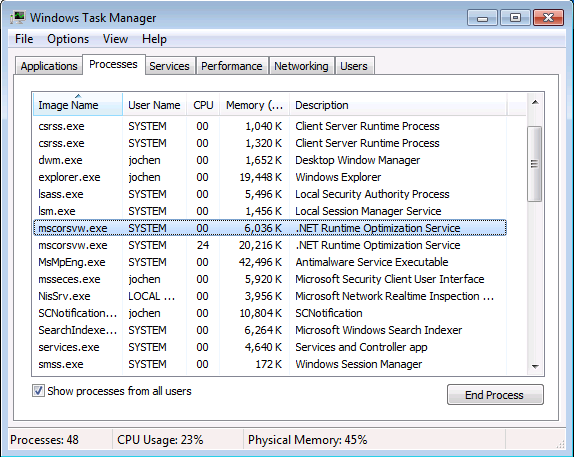
In some cases, this optimization service often consumes RAM and all the available memory, making your PC run slow and not have more capacity to store more data.
Contents
What Causes the .NET Runtime Optimization Service High CPU Usage?
When the computer is in idle conditions, the optimization service is programmed to recompile the.NET framework libraries in 5-10 minutes, but this wasn’t the case for some users.
Let’s know the underlying causes:
- .Net runtime optimization service may run slow on your device.
- Optimization service gets corrupted.
- A virus or any malware infection.
How to Fix .NET Runtime Optimization Service High CPU Usage
Solution 1: Optimizing the process
We do not recommend ending the optimization service because it helps to launch applications as quickly as possible. So there are ways through which we can speed up this process. There are certain commands and scripts, which will help the process to use more CPU cores and optimization service to finish running fastly.
Step 1. Press Windows + R, the Run dialog box appears.
Step 2. Type cmd in run prompt, click ok.
Step 3. Press Ctrl + Shift + Enter key to run the command prompt as an administrator.
Or
Search for the command prompt in the search bar, and as the command prompt option appears, right-click and choose the Run as Administrator option.
Step 4. Type these commands, and press the enter key after typing each one of them.
cd c:\Windows\Microsoft.NET\Framework\v4.0.30319
cd c:\Windows\Microsoft.NET\Framework64\v4.0.30319
Between the above given two commands, choose one according to your operating system.
(32 bit – command 1)
(64 bit – command 2)
Then, type this command:
ngen.exe executequeueditems
Step 5. Close command prompt, open task manager.
Step 6. Check if the CPU usage of the optimization service is resolved or not.
Alternatively, if you are not able to work with a command or your system doesn’t allow you to, you can try using the official script issued by Microsoft, which will help you to do the same:
Step 1. In order to download the official script, Navigate to Microsoft’s GitHub page.
Step 2. Right-click on the Raw button, click on the save link.
Step 3. Make sure that file’s save as type should be “windows script file,” (*.wsf), then click on save to download it on your PC
Step 4.locate the saved windows script file on your PC, then double click to run it or if a choice is shown, then choose the program to run it with, and select windows script host.
Step 5. The command prompt will execute the script on its own and will close automatically.
Step 6. check if the problem is resolved or not.
Solution 2: Scan Your Computer for Malware
Virus or any malware infection is running through your system, and that can cause and infect .NET Runtime Optimization Service High CPU problem.
Malicious programs always try to get hold of your system, and they often name their processes with file names that resemble other files on your system and making it difficult for you to remove them.
For this, try deep scanning your computer for malware with anti-malware software like Malwarebytes, Avast, SpyHunter, and others.
One such amazing antimalware software is Malwarebytes, which helps you scan and has a large database.
Malwarebytes Anti-Malware: you can buy it and get it ready for other problems, but it also comes with a free version that you can download from its official website.
Follow these steps:
Step 1. Locate the file (Malwarebytes) you’ve downloaded on your PC.
Step 2. Double click on the file to open it up.
Step 3. Select the install option and then follow all the installation instructions that show up on your screen.
Step 4. Go to the start menu and search for Malwarebytes, and click on the scan option available on its home screen.
Step 5. Before scanning it’ll launch its updating process for updating its virus database, and then scanning begins.
Step 6. Once the process of scanning is done, and if any malware is found, confirm to delete and remove those selected files.
Step 7. When done, restart your system.
Check if the issue is resolved or not. You can try installing other anti-malware software because one such software can not find all types of malware and delete them.
Solution 3: Restarting the Service
If you face.NET Runtime Optimization Service High CPU problem, then restarting the optimization service can help you. Even if there was a bug that caused the issue, it should complete its service quickly after restarting.
Follow these steps:
Step 1. Press Windows key + R, top open run prompt.
Step 2. Type services.msc in the Run dialog box, and then press enter to open the services tool.
Step 3. Scroll and find the NVIDIA telemetry container.
Step 4. Once you locate it, right-click on it, a menu will appear, choose properties from it.
Step 5. Then in the properties menu, under the general tab, set NVIDIA Telemetry Container startup type as automatic.
Step 6. See the service status (whether it is started or not).
Step 7. If you see the service status started, click on the stop option available on the screen.
Step 8. Run it again, and click on start.
Step 9. If you receive the given below error message:
“Windows could not start the service on Local Computer. Error 1079: The account specified for this service differs from the account specified for other services running in the same process.”
Then follow these steps:
Step 1. Repeat the same process till step 4.
Step 2. Navigate to the properties menu, under the log-on tab, and then click on browse.
Step 3. In the section “enter the object name to select” box, type your account’s name.
Step 4. Then check names, and wait till that name becomes available.
Step 5. When done, click OK. Type password in the password box on the screen.
Check if the issue is resolved or not.
Solution 4: Performing a Clean Boot
Sometimes 3rd party applications cause.NET Runtime Optimization Service High CPU usage. To check if this is an issue, we’ll run a clean boot of your PC.
Follow these steps:
Step 1. Open run prompt, type msconfig, click ok.
Step 2. Configuration window opens, under services tab check “Hide all Microsoft services box” and “disable all” option.
Step 3. It’ll request to restart your computer, but choose to restart later.
Step 4. Repeat step 1, when the configuration window opens, under the startup tab and select open task manager.
Step 5. Look at the last option, “startup impact,” and disable those shown under “high impact” by right-clicking on each of them.
Step 6. Restart your computer in clean boot mode.
Check if the issue is resolved or not. If the issue is solved, enable required apps that were labeled as high impact.
Conclusion
So these solutions can help you to fix.NET Runtime Optimization Service high CPU. All solutions listed above have helped and worked for many. Make sure to follow these steps given carefully. I hope this article turns out to be useful for you.
