If you see an Error Code 0x80070643 on your PC, then you are not alone. Many of the users have reported that they have been facing this error code while updating Windows. Usually, this update occurs while the process of automatic update is happening on your computer.
While it is updating, this code appears stating Definition Update for Windows Defender – Error 0x80070643. It obviously tells us that there was a complication during the installation of the update.
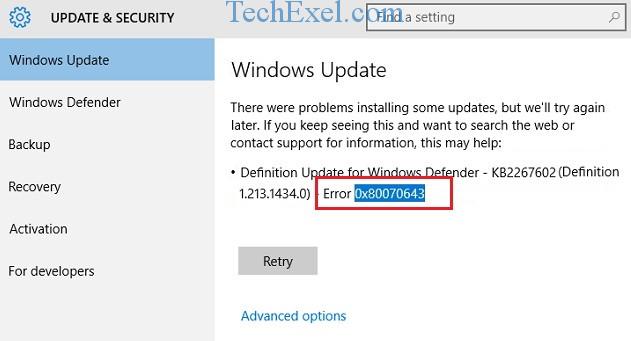
The reasons for error code 0x80070643 can be some corrupt registries or some remaining files of uninstalled Antivirus software which may be causing the error code. The solutions to Error Code 0x80070643 can be many, and here we are stating all of them for you. Take a look.
Contents
How to Fix Windows Update Error Code 0X80070643 in Windows 10
All of these solutions have been tried and tested by us. And we are sure that one of them will solve the error code 0x80070643 on your PC. Let’s proceed.
Solution 1 ⇒ Restart Your Computer
Restarting your PC solves several other error codes. It is one of the simplest solutions to solve issues. Sometimes the previous updates need a restart for the complete installation.
And if you don’t restart your computer, they may interfere with the installation of the next updates. If even after a restart the error code is present, try out our next Solutions.
Solution 2 ⇒ Disable Antivirus Program
Disabling the Antivirus can also solve the Error Code 0x80070643 as it may be conflicting with the installation of the latest update. To do this, follow the steps below:
Step 1 ⇒ Go to Start and search for Defender in the search box.
Step 2 ⇒ Click on Windows Defender Security Center.
Step 3 ⇒ Next, click on Virus and Threat Protection.
Step 4 ⇒ Go to Real-Time Protection and Turn Off the option.
If you are using Avast Antivirus, follow these steps:
Step 1 ⇒ Find the Avast Antivirus icon from the taskbar and right-click on it.
Step 2 ⇒ Now, go to Avast Shield Control and select the minimum time, for example, 10 minutes.
Step 3 ⇒ Accept the confirmation.
Step 4 ⇒ Check if you are now able to update Windows without any issues or not.
Solution 3 ⇒ Install the Latest Version of .NET Framework
.NET Framework is important for a successful installation of the updates. If it is outdated or is not at all present on your PC, then you might have to install it from the Internet. Follow the steps below to install the latest version of the .NET Framework:
Step 1 ⇒ Open your browser and go to Microsoft’s .NET Framework official website.
Step 2 ⇒ Select the latest version of .NET Framework, which is available for download.
Step 3 ⇒ Click on the Download button and wait till the downloading is complete.
Step 4 ⇒ Now double-click the file to install it and follow the on-screen instructions.
Step 5 ⇒ Now check if the error code 0x80070643 is still present or not.
Solution 4 ⇒ Re-start Windows Installer Service in PC
Restarting the Windows Installer service might be of help as there may be some faulty configuration causing the 0x80070643 issue. Follow the steps below:
Step 1 ⇒ Press the Windows Key + R at the same time to invoke the Run dialog box.
Step 2 ⇒ In the Run dialog box, type services.msc and hit Enter.
Step 3 ⇒ Find & Click on Windows Installer.
Step 4 ⇒ In the left pane, click on Restart.
Step 5 ⇒ If this Solution worked for you, you will now be able to install the updates without any problem.
Solution 5 ⇒ Update Windows Defender Manually On Your PC
Updating the Windows Defender manually has also proven to be successful for many users. Try it with the help of the steps mentioned below:
Step 1 ⇒ Go to Start.
Step 2 ⇒ Search for Windows Defender.
Step 3 ⇒ Next, click on Virus and Threat Protection Settings option.
Step 4 ⇒ Now click on Virus and Threat Protection Updates.
Step 5 ⇒ Click on Check For Updates.
Step 6 ⇒ After the process is complete, Restart your PC and check if the issue got solved.
Solution 6 ⇒ Run Scannow or SFC On Your PC
SFC Scannow command can solve a lot of problems as it replaces the files that were corrupted with new ones. To run this command, follow the steps below:
Step 1 ⇒ Go to Start.
Step 2 ⇒ In the search bar, type cmd
Step 3 ⇒ Right-click on the command prompt application and click on Run As Administrator.
Step 4 ⇒ Click Yes if any prompt appears.
Step 5 ⇒ Now type sfc /scannow and hit Enter.
Step 6 ⇒ Now it will start scanning for any issues with the PC and will solve them automatically. Afterward, try to install the updates again and see if you are met with the error code 0x80070643.
Solution 7 ⇒ Perform a Clean Boot of Your PC
In a clean boot, all 3rd party services are disabled, which may be causing the error to pop up. To boot into the clean state, follow the steps below:
Step 1 ⇒ Press the Windows Key + R simultaneously.
Step 2 ⇒ In the Run box, type MSConfig and hit Enter.
Step 3 ⇒ Click on the Services tab.
Step 4 ⇒ Uncheck the box next to Hide All Microsoft Services.
Step 5 ⇒ Now, click on Disable All button and then click on, OK.
Step 6 ⇒ Now go to the Startup tab.
Step 7 ⇒ Click on Open Task Manager.
Step 8 ⇒ Now, again click on the Startup tab in the task manager.
Step 9 ⇒ Next, you have to disable any application that is enabled. Click on the application which has the Enabled status, and then click on Disable.
Step 10 ⇒ Restart your PC to get into the Clean Boot state.
Solution 8 ⇒ Use Troubleshooting
The Troubleshooter tool is built into Windows for errors like 0x80070643. It will automatically find the best solution and will apply it. To run the Troubleshooter, follow the steps:
Step 1 ⇒ Go to Start.
Step 2 ⇒ Type Troubleshoot in the search box and open the Troubleshooter Application.
Step 3 ⇒ Expand the Windows Update option and then click on Run the Troubleshooter.
Step 4 ⇒ Follow the on-screen instructions.
Step 5 ⇒ Restart your PC and check if the 0x80070643 issue got solved.
Solution 9 ⇒ Use System Restore Feature
System restore is also an efficient tool built into Windows by Microsoft so that you can go back to the version of Windows which was working perfectly fine. To do this, follow these steps:
Step 1 ⇒ Go to Start, search for System Restore, and open the first search result.
Step 2 ⇒ Now, if you are asked for any Passwords, put them in, and then Choose a Restore Point.
Step 3 ⇒ Restore your system.
Step 4 ⇒ Restart the PC and check if the Error 0x80070643 still persists.
Solution 10 ⇒ Reset The Components of Windows Updates
Step 1 ⇒ Go to Start.
Step 2 ⇒ Search for Command Prompt.
Step 3 ⇒ Right-Click on the cmd prompt application, and click on Run as Administrator.
Step 4 ⇒ Then type the following commands and press Enter after typing each one of them to execute:
net stop wuauserv
net stop cryptSvc
net stop bits
net stop msiserver
Step 5 ⇒ Now type the following commands in the same Command Prompt window and hit Enter after typing each one of them.
Ren C:\Windows\SoftwareDistribution SoftwareDistribution.old
Ren C:\Windows\System32\Catroot2 catroot2.old
These commands were used to rename the Software Distribution Folder.
Step 6 ⇒ Now again type in the commands and press Enter after typing each one of them to start the Windows Update Services:
net start wuauserv
net start cryptSvc
net start bits
net start msiserver
Step 7 ⇒ Restart your PC for the changes to take effect.
Solution 11 ⇒ Uninstall Windows Defender Update
Uninstalling any update to the Windows Defender and taking it back to an older version might help to solve the issue as the latest update must have broken something. Follow these steps ⇒
Step 1 ⇒ Go to Start, search for Control Panel, and open it.
Step 2 ⇒ Click on Programs and Features.
Step 3 ⇒ Click on View Installed Updates in the left pane.
Step 4 ⇒ Next, scroll to the bottom and find Windows Defender or KB4054517 Update.
Step 5 ⇒ Right-click on it and then click Uninstall.
Step 6 ⇒ Would reboot your PC if it solved the error.
Solution 12 ⇒ Update Using Administrative Permissions
Some updates require the permission of an administrator when you need to install them. If your PC is owned by an organization, ask them to log in from the admin account. Or if you are logged in as a guest, log in with the account of the administrator and then try to install the updates.
Solution 13 ⇒ Run SubInACL Tool
The SubInACL tool will help you fix registry permissions or some corrupt file that is preventing you from installing the update. Here is how to use this tool:
Step 1 ⇒ Download the SubInACL tool by searching for it on Google.
Step 2 ⇒ Install it. The tool will be installed in the following path.
C:\ProgramFiles\Windows Resource Kits\Tools
Step 3 ⇒ Now, go to this file.
Step 4 ⇒ Copy and paste all of the text in that file to the Notepad.
Step 5 ⇒ Go to the File option in the top-left corner and then click on Save As.
Step 6 ⇒ Now rename the file to reset.cmd and change the file type to All Files.
Step 7 ⇒ Right-click on this file and then select Run As Administrator.
Step 8 ⇒ Wait for the process to complete, and then try installing the updates again to see if it worked for you.
Recommended:
- No Audio Output Device is Installed
- ERR_NAME_NOT_RESOLVED on Google Chrome
- Error 0x80070035 ‘The Network Path Was Not Found.’
- Discord Overlay Not Working Issue in Discord
Conclusion
So these were our best 11 Solutions that can solve the Error Code 0x80070643. Don’t worry as these issues are bound to happen, and you can’t ignore them. And that’s why we are here to help you through it. If you need any help with any other errors, reach out to us.
