WMI Provider Host (WmiPrvSE.exe) is an important service, without which some of the most important applications would stop running. It stands for Windows Management Instrumentation Provider Service. This app is mainly used by developers.
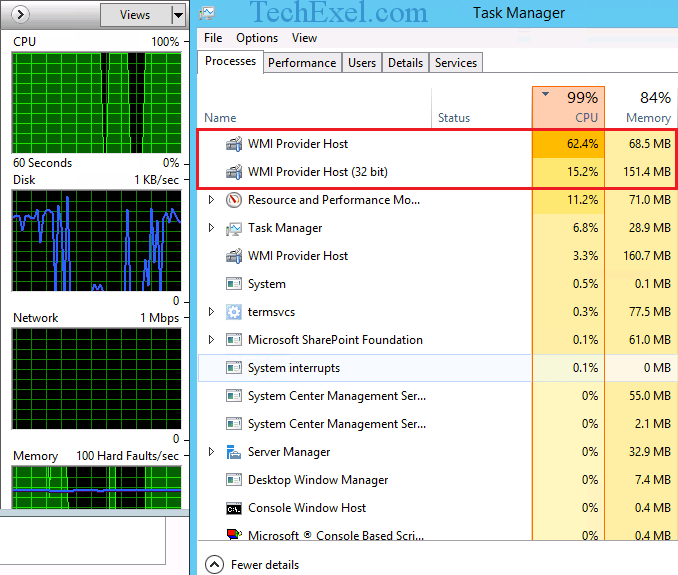
After the users upgrade to Windows 10, they have noticed that WMI Provider Host is consuming a lot of CPU power, and when this happens, the PC starts to lag, it becomes really slow and starts to cause problems. You are not the only one facing this issue as many of the users reported it after upgrading to Windows 10.
Contents
4 Ways To Fix WMI Provider Host (WmiPrvSE.exe) High CPU Usage On Windows 10
And today we will help you solve WMI Provider Host Error with some of the tried and tested methods by us. Take a look at them.
Solution 1 ⇒ Restarting The Windows Management Instrumentation Service
Restarting the WMI service might help in resolving the issue as a restart solves most of the complications in most cases. Follow the steps below:
Step 1 ⇒ Press Windows Key + R simultaneously.
Step 2 ⇒ In the Run dialog box, type services.msc and hit Enter.
Step 3 ⇒ Scroll down to the bottom and find Windows Management Instrumentation Service.
Step 4 ⇒ After you have found the service, Right-click on it.
Step 5 ⇒ Click on Restart.
Now once it is restarted, follow the next step mentioned below.
Solution 2 ⇒ Restart Other Associated Services
To restart other associated services with WMI Host Provider, follow these steps:
Step 1 ⇒ Go to desktop, and press Windows Key + X simultaneously.
Step 2 ⇒ Now from the menu, click on Command Prompt (Admin) to open an elevated command prompt.
Step 3: In the command prompt, type the following commands and hit Enter after typing each one of them:
net stop iphlpsvc
net stop wscsvc
net stop Winmgmt
net start Winmgmt
net start wscsvc
net start iphlpsvc
Step 4 ⇒ After you have done the process, Restart your PC.
If this didn’t solve the issue and the WMI Host Provider is still hogging your CPU usage, try the next method.
Solution 3 ⇒ Perform A Clean Boot To Identify A Faulty Application
A clean boot will help us solve the problem as a third-party application might be the cause of the high CPU usage. In a clean, only those services startup which are essential for a PC to boot up. To perform a clean boot, follow the steps below:
Step 1 ⇒ Press the Windows Key + R simultaneously.
Step 2 ⇒ In the Run dialog box, type msconfig and hit Enter.
Step 3 ⇒ Click on the Services tab.
Step 4 ⇒ Uncheck the box next to Hide All Microsoft Services.
Step 5 ⇒ Now, click on Disable All button and then click on Ok.
Step 6 ⇒ Now go to the Startup tab.
Step 7 ⇒ Click on Open Task Manager.
Step 8 ⇒ Now again click on the Startup tab in the task manager.
Step 9 ⇒ Next, you have to disable any application that is enabled. Click on the application which have the Enabled status, and then click on Disable.
Step 10 ⇒ Restart your PC to get into the Clean Boot state.
Step 11 ⇒ Now check if the high CPU usage issue is still present.
Step 12 ⇒ If there’s no issue, it means that a third-party service was causing it.
Step 13 ⇒ Now start by enabling the services one by one and stop the moment you see high CPU usage again.
Step 14 ⇒ Now reinstall that particular service which was causing the issue if its an important service. If it’s not important, keep it disabled.
Solution 4 ⇒ Locate The Process Using Event Viewer And Uninstall It
Using the Event Viewer, we will Uninstall any corrupted drivers. Follow the steps below:
Step 1 ⇒ Press Windows Key + X simultaneously.
Step 2 ⇒ Now click on Event Viewer.
Step 3 ⇒ Next, click on the View button, and then click on Show Analytic and Debug Logs.
Step 4 ⇒ In the left pane, follow this path: Applications and Service Logs > Microsoft > Windows > WMI Activity > Operational log.
Step 5 ⇒ Now mark the items listed as errors. Next, click on the errors.
Step 6 ⇒ Now, under the General tab, look for the ClientProcessId, and then note down the numbers written against it. Do this for every error.
Step 7 ⇒ Now, open the Task Manager in the same way you opened the Event Viewer.
Step 8 ⇒ Next, go to the Services tab. Now in the PID column, look for the IDs matching the ones which you noted down from the Event Viewer in Step 6.
Step 9 ⇒ Once you find them, disable those services right away. Then go to Programs and Features in the Control Panel and uninstall those programs which were associated with those services.
Now the WMI Host Provider should be using normal CPU power.
Recommendation:
- NVIDIA Installer Cannot Continue
- Error Code 0x8007000D
- You Have Been Disconnected from the server (WOW51900319)
- Discord Update Failed
Conclusion
So these were the methods that will surely help you save your CPU Power and will bring back the speed of your PC. Do let us know if you need any help with any of the other errors.
